So many options!

Showing posts with label Before and after. Show all posts

09 September 2013

Back with a vengeance

It has been one heck of a long time since I have posted a project. Over the summer, as I was in my temporary residence, I was itching to do something creative. I couldn't wait to get in to my new, permanent house and go crazy making it lovely. Seriously, there were moments I was giddy with anticipation. Embarrassing picture? Yes. But I am not above embarrassing myself, and now you know what I sometimes do in my free time. Yeehaw.

My roommates and I have been in the new house for a month. Things are getting pretty and pretty settled as of a few days ago. For the first few weeks, I had spurts of organizing, hanging pictures, and general new-house activity. This weekend, we hosted a house blessing-housewarming party. It was an excellent excuse to put the medal-to-the-metal, as it were, and finish up my To Do list. While I am still editing House Tour pictures, I wanted to share two projects I tackled in the last few days.

These two projects are ones I've been wanted to do, and simultaneously putting off, for two years.  Perhaps because I am a procrastilaxer extraordinaire, I suddenly felt very motivated to complete each last week instead of doing other things that might have been more worth my while. Something tells me this is a skill I should leave off my resume....

Moving on. There was an informal "Thirsty Thursday" organized for people in my program. It was optional, so I took them up on that. Instead of getting my drink on, I locked myself in my basement with some paint fumes and gave this set of boring black mirrors a face lift.

  
Before aaaaaand After

I went into the project intending to paint two mirrors solid gold and two solid silver. Though I didn't snap a picture of it, I found the scheme too boring so I went on to add the check/stripe effect on the two gold mirrors. I was, and still am, very pleased with this second result.
Can you say, "Fabulous"?
The quartet now takes up wall residence next to our front door. Prime location for last minute beauty checks as we dash out the door.
I know you love it.
Up next is this baby:

After returning home from dinner and drinks with friends for one's birthday, I whipped this pillow up. No sewing machine. No pattern. Just an uglya$$ pillow, new fabric, and needle'n'thread. Oh, and can't forget Grooveshark.
closest thing to a before-after...I.e. I still have another one to cover=the fun ain't over yet(!)
As I said, I had no pattern to follow while sewing. I have a little experience making pillows, but I did not want to replicate that pattern since this pillow would be in the same room as the first. Still, with no sewing machine, my options were pretty limited since there is no way I can hand stitch as well as a machine. So--simple it had to be. Thanks to my mom, I know how to make a ruffle, which came in handy in making the design less boring that it otherwise might have been.

I have to admit, I am pretty surprised and impressed with the outcome. Call me a design geek, but each time I catch a glance of this baby I'm like, "Did I seriously made that?!"

Talking to oneself = Super-cool.

As they say: Pride cometh before the fall; I expect to face-plant sometime soon. So I should probably stop while I am ahead and you are still awake. As always, thank'ya muchly for reading. Up next: Re-cap of the move-in and a house tour. Get excited!


27 May 2013

A recommendation...

This is the best way that I can recommend to anyone how to handle moving day:


 Just turn off all emotions and git'er'done. Otherwise,

19 May 2013

Moooooooooooving

What does a cow say? ...Mooooooooooooooo(ve)
Saw whaat??
That's right, folksies--I'm moving! When, you ask?

26 July 2012

Time Tunnel

Oh. Heeey...Three months goes by way faster (like, WAY FASTER) than I can believe. Was it really April that I last checked in with you? Geesh. That's embarrassing...

Excuse: The rent contract was up for renewal in May. Since I had a few loose ends in my life, I debated long and hard about the possibility of moving. Ultimately I decided to stay put. During the deciding period, I put all projects on "hold" for the entire month of May while I sorted through my options. What's the point of home improvement if [1] you are going to move really soon and [2] you don't have to spruce up the place for selling? 


After re-signing the lease and settling in (if you can say that, it's not like I ever unsettled) for another year, I got busy with my back log of projects--only I never got around to sharing any of it with. Whoops! Now here we are in July. If I had a tail it might be between my legs at this moment. But, alas, tails were snuffed out of my species quite some time ago.

Enough of my pseudo-self-chastisement/CYAing. Let's get down to biznizz. And, yeah, I have been biznizzy (i.e. "busy" for all the non-gansta folk readers). Though I left you out of the loop, you can now expect a steady stream of "what I've been up to" posts as I catch you up to speed.

First up, the bedroom.


As you recall, I have been trying to fix up the other half of the room because it was, well, embarrassing the nice half.


I cringe looking at this picture. Something is afoul in Denmark and it is this corner of my bedroom. (For those of you who didn't get the reference, pick up the nearest copy of Bill Shakespeare's Hamlet).

The highest priority for this corner was rearranging the gallery wall(s). Over the course of the months of March, April, May, June and July (I am not exaggerating), I tried numerous times to remedy the sorry situation. Here is a photo-review of my earnest stabs in the dark. Seriously, I felt like I was in darkness...


This was my first attempt. I mapped it out on paper beforehand and was pretty excited to see how it looked up on the wall. Let's just say it was a major letdown. I had a bad taste in my mouth about the arrangement by the end of the week. Being the eternal design optimist that I am, I decided I would leave it be for a little bit and see if it grew on me.

Nope. Not a chance. In fact I got more dissatisfied with it each day I had to wake up with it staring back at me. Something had to change. I chronicled my many attempts for happiness-a-la-wall.

Psssh. No.
Nice try. Not.

Failed at failing.

Voted off the island.
I was getting pretty down about the prospect of having a half-pretty-half-embarrassing bedroom. Something had to change. I slowly had built up my stash of wall hangings, but things just weren't falling together like I had hoped.

For a while I had entertained the idea of painting the frames of the pictures white and possibly swapping out the old photos for new ones. After one too many new nail holes in my wall, I decided it was time to get down to business and simply change what I was working with. Cue the spray paint.

Boom.
Bang

BAM!

While the paint dried, I printed out some new family photos and picked up a few photo mattes at my friendly neighborhood Wal-Mart. I forgot to get close-ups of the new family snap-shots, sorry. But, trust me, my family is really good looking.

After reassembling the photos with their appointed frames and spending about and hour and a half deciding on a gallery layout, this is what I ended up with.


I am pretty happy with the outcome! I had hoped to be able to spread the pictures, etc., across the two walls. Check! I also craved some kind of continuity or unifying element that would allow the walls actually to smell something along the lines of an eclectic style, instead of the "here is a bunch of random crap I've collected over the years and slapped on the nearest wall" look. 

To help create the look I was going for, I swapped the brown desk chair out for a white one that I had in another room. Not only does the white go well with the new white frames, it also is a better match for my white desk (you can see one of the desk's legs in the photos). The chair's cushion goes well with the warm, yet bright tones in some of the wall hangings as well as the color palette of the bed's quilt (not pictured, see it in an earlier post). I already had the green-black-n-white side table bookcase in the room, only you probably couldn't tell because it was always pushed off in a corner since I couldn't find a satisfactory place to put it in the room. Since I painted the table myself, I was glad to finally be able to fit it comfortably in to the room's layout. 


So, there it is: A new conversation-corner-slash-reading-corner-slash-guest-quarters (the futon lays out for a very comfy sleep arrangement for overnight visitors). It's a far cry from landing on the cover of Elle Decor Magazine, but it will more than do for now. I finished up the arrangement almost three weeks ago and I am still very happy with it. A big change from the previous attempts!

25 April 2012

Mix-n-match: Bathroom Bonanza

I should probably admit, right off the bat, that this post's title is a bit of an overstatement. I didn't go all crazy and redo my bathroom. I just made a few tweaks, but I think they are splenderific tweaks at that. 

Until last weekend, I really hadn't put much effort into spiffying up the downstairs bathroom. 


If ever were the saying, "If you snooze, you lose," true--it was true for this bathroom. And that is a fact. Although this bathroom is on the main floor of the house, I don't really use it all that much. Without going into much--if any--detail, it seems that Mother Nature calls me at home only when I am upstairs. Yet, whenever I have visited the first floor commode (whether it be to tidy things up for guests, or to figure out why the toilet is running yet again, or to check out my awesome self in the mirror), I never left that closet-of-a-room without thinking, "Ohmuhgudnizz, something has to be done to that room."


Now, despite the underwhelming state of the bathroom, I am making a very conscious effort to spend as little money as possible these days. Instead of acquiring new stuff to stave off my decorating woes, I wish to use what I have before succumbing to hoarding at my relatively young age.

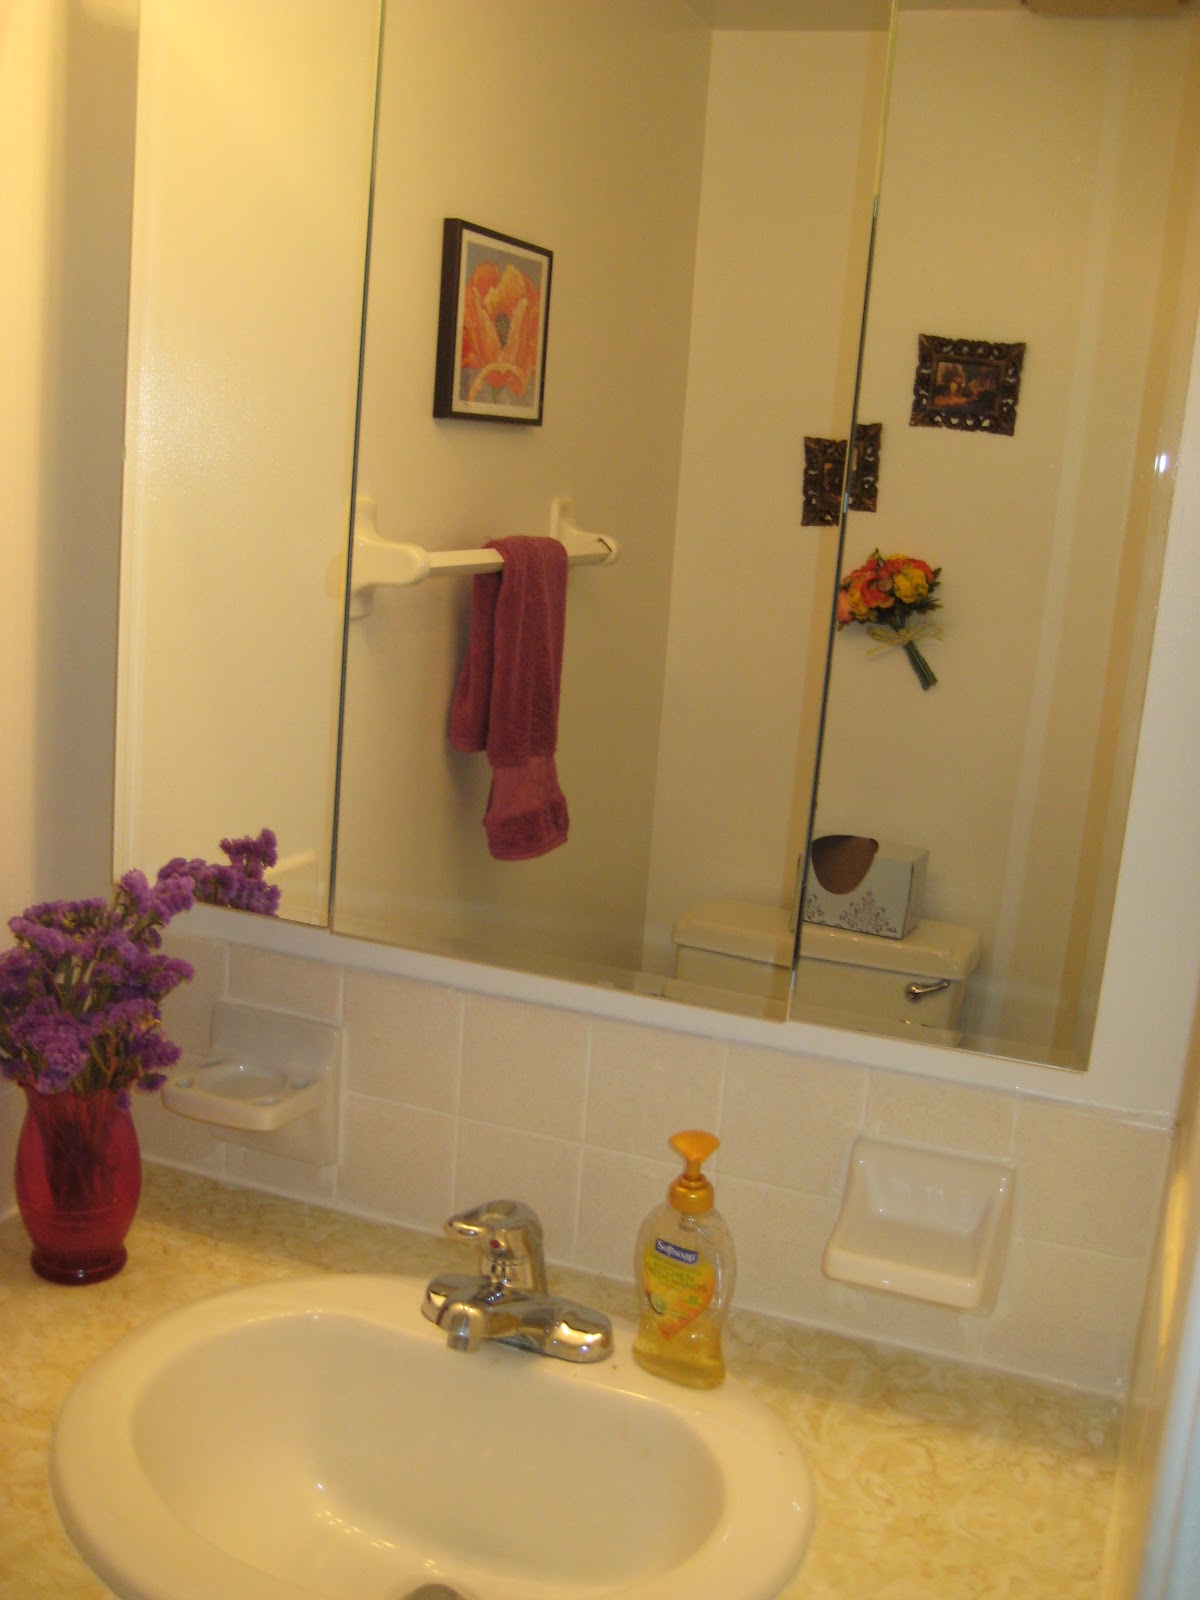
I did succumb to hoarding urges, slightly, while visiting a local consignment shop. But it was only $6 (total) for two sweet pastoral landscape scenes in lovely ornate frames.

Thing One

Thing Two


Aren't those classy and elegant? I instantly fell in love and, at $3 a pop,  it was $6 I happily parted with. My purchasing weakness behind me, it was back to the bathroom with my treasures. With some quick rearranging and a few extra nails, this is what I had.


Simple and not super glamorous (or even all that different, I suppose), but it does make a difference. Believe or not. I also pulled in a dried floral arrangement, previously was in the kitchen, and put it on the vanity counter.


Here is a quick before and after for you:

Again, not much, but it's a start. Maybe one of these days I'll go crazy and paint a mural on one of the walls. 
But--for now--I like it. 


Anybody else making small-but-still-worth-it adjustments to any rooms in your home?

12 April 2012

Lampshadapalooza

I have been a bit ADD with my bedroom corner remake. I have a rough plan/idea of the direction I want to take the room area. Yet, I can't seem to do (read: "finish") one thing at a time. Case in point: The multi-headed lamp I started a few weeks ago. Here is a refresher of what I started with:

Mmm, hot and dangerous!

From here, I took the lamp to something like this:


I am still working on figuring out how to better connect/unite/unify/transform the individual stems of the lamp heads. Any ideas out there??

In the meantime, I gave you a preview last week that I have finished fancying up the lampshade. So, I am here today to show you the how-to of that accomplishment.

I started out with a curtain valence that I bought on sale at Wal-Mart. It is a champagne-gold sateen fabric which is layered in tiers.


I had to do a little maneuvering/trial-and-error testing before figuring out how I was going to attach the curtain to my lampshade. Here is a picture of of the curtain simply clipped to the shade. Notice [1] it wraps about one-and-one-fourth ways around the circumference, and [2] it is twice as long as the shade's height. 

To remedy the circumference issue, I took some spare fabric and laced it through the space where a curtain rod normally would be inserted.


Then I used my hot glue gun to pucker the upper ruffle of the curtain. If had not done this, the upper ruffle would have laid limply. That would have been gross.

Sorry, this apparently is the only picture I took during the hot gluing process!
After letting the glue set, I set to address the problem with the length. What first drew me to the curtain was the tier design. With the idea of a wedding dress bustle in my mind, I decided I would try to "bustle" the tiers using needle and thread. Here is a panned out picture of my work station, aka my desk.


At first I was simply sewing the fabric to itself:


 but that quickly proved itself not to work as the weight of the fabric resulted in a sagging effect, where I was going more for a light-weight look. 


In, out, and repeat!

To fix this, I changed my method to sewing the curtain layers right into the lampshade. By tethering the fabric right into the shade, the fabric no longer weighed itself down. Since the curtain had four tiers of fabric, the lampshade has four layers of bustle. I attached the fabric with two to three stitches per point--just enough to securely attach the fabric without leaving a bulk of thread to conceal later. If I had really planned out my attack, I probably would have measured out and marked the lines and points of attachment. Maybe I will do that next time. This time I just eye-balled it.


After a little primping and fluffing, I officially declared the lampshade a successful finish!


What do you think? Any ideas on how I can best finish off the lamp's base? I could use your helpful suggestions!

07 March 2012

A Long Time in Coming

Do you remember how I told you that I am a garbage person?


Well, I might have some fairy magic in me too. Because lookie how that hot-mess-of-a-chair looks now.


But wait, it gets even better...


Ah! I am so glad that I am finished with this project. For those of who have been paying attention to this blog, you'll know that, from start to finish, this was a six-month project for me. Now, in my defense, I was NOT working on this project during the entire six month spread. I didn't touch it for a full and a half months (Thanksgiving through mid-February) because.....well, time just happens.

For those of you new around this blog, here is a quick run through of the past posts on the subject of this chair.


After telling you so much about the chair, I am just going to let the pictures do the talking for a while. Anyways, my fingers are a bit tired after pulling out so many staples...

In Progress:


Finish product (and in its new home: The Living Room)


A few imperfections here and there...oh well!


Unfortunately I forgot to take pictures while making the pillow. It is a very simple design, however. I saw a pillow at Walmart. I liked the way it looked and just kind of "winged it" at the sewing machine. Didn't turn out all that bad, eh? The fabric and the *shiny* pin are from Hobby Lobby. Gotta love that store.

So shiny!

Up-close deets


Though it was a lot of work and demanded a lot of patience and perseverance on my part, I am really happy with the outcome! It is really exciting to have accomplished this (it was my first attempt at reupholstering). I wonder what the garbage dump will give me next!

Linking to: